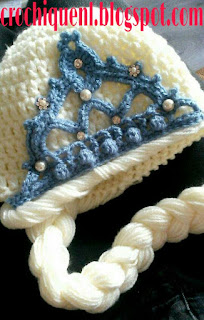
(US) Elsa inspired Iced hat
The second Frozen movie is a fact! And all the girls want to be like Elsa. I made an iced Elsa inspired hat for everyone that loves Elsa..or bling or crowns :)
You can use any standard beanie pattern. If you have a 'go to' beanie pattern you know will work for you..Use it! If you don't have one, no worries. I have written a pattern to make one.
I went to a Dutch store called Action to buy my yarn and bling.

The yarn is worsted weight yarn. (100 gram is 238 meters) i used 2 skeins crème and 1 blue.
For the beanie i used an I hook (5.5mm)
For the crown i used an E/4 hook (3.5mm)
More info on the bling at the end of the post.
The beanie pattern:
I used two strands at the same time to crochet the beanie
I made my beanie for my 4 year old daughter.
- Magic circle, chain 2 (doesn't count as a stitch) and 10 double crochet into the magic circle. Slip stitch in the 1st double crochet (CH2 and 10DC)
- Chain 2, make 2 double crochet in each stitch , slip stitch in the 1st double crochet ( CH2 and 20 DC)
- Chain 2, *make 2 double crochet in 1 stitch, 1 double crochet in the next. * Repeat till the end of the row. Slip stitch into the 1st double crochet. (CH2, 30DC)
- Chain 2, * make 2 double crochet in 1 stitch, 1 double crochet in the next 2 stitches. * Repeat till the end of the row. Slip stitch in the 1st double crochet. (CH2, 40DC)
- Chain 2, * make 2 double crochet in 1 stitch, 1 double crochet in the next 3 stitches. * Repeat till the end of the row. Slip stitch in the 1st double crochet. (CH2, 50DC) .
- Chain 2, double crochet in every stitch, slip stitch in the 1st double crochet. (CH2, 50 DC)
- Repeat row 6 till you made have 12 rows.
- Fasten off and weave in the ends.
I also made this beanie for my 6 year old daugther.:
- Magic circle, chain 2 (doesn't count as a stitch) and 11 double crochet into the magic circle. Slip stitch in the 1st double crochet (CH2 and 11DC)
- Chain 2, make 2 double crochet in each stitch , slip stitch in the 1st double crochet ( CH2 and 22DC)
- Chain 2, *make 2 double crochet in 1 stitch, 1 double crochet in the next. * Repeat till the end of the row. Slip stitch into the 1st double crochet. (CH2, 33DC)
- Chain 2, * make 2 double crochet in 1 stitch, 1 double crochet in the next 2 stitches. * Repeat till the end of the row. Slip stitch in the 1st double crochet. (CH2, 44DC)
- Chain 2, * make 2 double crochet in 1 stitch, 1 double crochet in the next 3 stitches. * Repeat till the end of the row. Slip stitch in the 1st double crochet. (CH2, 55DC) .
- Chain 2, double crochet in every stitch, slip stitch in the 1st double crochet. (CH2, 55 DC)
- Repeat row 6 till you made have 12 rows.
- Fasten off and weave in the ends.
On to the crown!
It is really hard to write it down in words, so i made a couple video's to crochet along with. Lots of slip stitches and weird placement of single crochets so:
Making the hair:
I wrapped my yarn around two dining table chairs. The strands are 1,60 meters long. (1,75 yards)
Make one for every stitch.
Fold the strand in half. insert your hook in a stitch. Pull the loop of the strand trough the stitch and pull the 2 strands trough the loop. Pull tight with your hands and repeat till you have a strand in every stitch. Here's the video!
Divide the number of strands by 3 ( To ge an even number for the braid) Wrap a rubber band around 1/3 of the strands. Now start working with the 2/3 of the strands.
Grab 10 strands of yarns an twist them 2 times, add a new strand and twist ones, add another strand and twist once. You can put a rubber band on it to keep i save till you twisted the other strands.
Grab 10 of the remaining strands and twist them, repeat as explained above till you are out of strands.
Divide the big twisted strands into 2 big strands. Grab the smaller twisted strand and make a normal braid. Put a rubber band on the end of the braid or use some left over yarn to tie a knot and weave the ends into the braid.
Sew the crown onto the beanie and add the bling :)
I used little bling that goes in your hair. It has a metal spiral on them so i can twist them in. You can also use bling with little holes in them to sew them on.
Maybe use a little sparkle yarn in the crown? Change up colors?
I hope you enjoyed making this beanie. I sure did!
Don't forget to show me yours!
Happy hooking!
© 2017 CrochiqueNL, Marriëlle van der Gun. All rights reserved. This pattern is for personal use only. The pattern or parts of the patterns cannot be multiplied or republished in any way, or be altered or sold. The finished product of this pattern may be sold. For questions please contact : crochique.nl@gmail.com


Comments
Post a Comment